Showing posts with label 1997. Show all posts
Showing posts with label 1997. Show all posts
Wednesday, March 27, 2013
Fuse Box Toyota 1997 Camry CE Diagram
Fuse Box Toyota 1997 Camry CE Diagram - Here are new post for Fuse Box Toyota 1997 Camry CE Diagram.

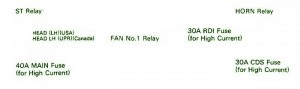
Fuse Panel Layout Diagram Parts: engine main relay, horn relay, RDI fuse, CDS fuse, headlamp, head relay, St relay, main fuse-high current, EFI relay.
Full Article here..
Fuse Box Toyota 1997 Camry CE Diagram


Fuse Panel Layout Diagram Parts: engine main relay, horn relay, RDI fuse, CDS fuse, headlamp, head relay, St relay, main fuse-high current, EFI relay.
Saturday, January 26, 2013
1997 Chevrolet Blazer Anti lock Brake Circuits Wiring Diagram
The schematic / diagram below shows the picture of 1997 Chevrolet Blazer Anti-lock Brake Circuits / Wiring Diagram

Full Article here..
The system consists of: left front wheel speed sensor, right front wheel speed sensor, vehicle control module, vehicle speed sensor, diode module, instrument cluster, front axle switch, I/P fuse block, TCC / stop lamp switch, Brake Pressure modulator valve. The picture also shows their locations.
SYSTEM WIRING DIAGRAMS
Anti-lock Brake Circuits
1997 Chevrolet Blazer
Source Diakom-Auto
Friday, January 25, 2013
1997 Toyota Camry 2 2 L How to Replace the Serpentine Belt On 1997 Toyota Camry 2 2 L

How can I replace the Serpentine Belt on my 1997 Toyota Camry 2.2 L 4 Cylinder?
Answer: Toyota Camry equipped with power steering has two belts. One that operates between the crankshaft pulley and power steering pump. The other is drive belt that operates from the crankshaft pulley to the alternator and air conditioning compressor. To replace the large diameter belt that drives the alternator, you have to remove the plastic shield in front of the crankshaft pulley (held in place by two 10mm bolts). The pivot bolt on top of the alternator is loosened (14mm), the bolt that secures the front ear of the alternator (12mm) is slackened and then a long threaded adjusting bolt (12mm) is turned to loosen the drive belt so it can be removed and replaced. It is more difficult to replace the power steering belt since it is accessed from the bottom of the car so the car must be jacked up and supported by axle stands. A bolt on the power steering pump adjusting bracket and the pivot bolt for the power steering pump must be slackened to enable the power steering belt to be replaced. After replacing the fan belts assemble in reverse order. Ensure fan belts are properly tensioned and aligned. Start the engine and allow to run for a minute. Re check alignment and drivebelt tension. Turn on air conditioning, headlights, heated rear windscreen and start the engine, turn the steering wheel form side to side, if belts are properly tensioned the belts should not “squealâ€. If belt “squeal†is heard the fan belts are improperly tensioned or aligned.
Subscribe to:
Comments (Atom)